How to Set Up Jira Automation in 2026: Step-by-Step Guide
Learn how to set up Jira automation step-by-step with examples, rules, and best practices to streamline workflows in 2026.

Jira is powerful, but keeping projects moving often means spending too much time on small administrative tasks. Updating tickets, assigning work, sending reminders, and managing workflows can quietly take over your day before you realize it.
When those manual steps pile up, they do more than slow you down. They pull your attention away from the work that actually pushes projects forward. Research even suggests that up to 50% of work activities can be automated, highlighting just how much time teams often lose to repeatable processes.
Jira automation helps shift that balance. By setting up rules that handle repetitive actions, you create a system that supports your team without constant supervision. Instead of reacting to every update, you can trust your workflows to run the way they should.
In this guide, you’ll learn what Jira automation is, why it matters, and exactly how to start building automated workflows that support your team instead of slowing it down.
What is Jira Automation?
Jira automation is a feature within Atlassian Jira that allows teams to create rules using triggers, conditions, and actions to automate workflows, manage tickets, and reduce manual project work without coding.
It lets you create rules to handle repetitive actions across Jira tickets and projects. Instead of manually updating fields or moving issues through workflows, automation rules take care of those steps based on conditions you define.
Here are a few common components of Jira automation:
Workflows - Define how tickets move from one stage to another, such as from "To Do" to "In Progress" to "Done." Automation ensures those transitions happen consistently when certain criteria are met.
Triggers - Start an automation rule. For example, a rule might activate when a ticket is created, when a field changes, or when a deadline approaches.
Conditions - Control whether the rule should continue running. They help you target specific projects, ticket types, or priorities so the automation stays relevant.
Actions - Determine what Jira does once the rule runs. This could include assigning tickets, updating fields, sending alerts, or creating linked issues.
Smart values - Allow you to pull dynamic data from tickets and insert it into comments, messages, or fields. They help personalize automated updates without requiring manual input.
Service management support - Helps teams automate request routing, approvals, and responses so service stays consistent without increasing workload.
When these pieces work together, you create structured processes that guide tickets from creation to completion with minimal manual effort.
Benefits of Jira Automation
Putting business-level automation in place can change how your team experiences daily work. Here are some benefits you’ll likely notice once repetitive tasks stop demanding your attention:
Spend less time on busywork - Automation takes routine updates off your plate so you can focus on meaningful project work instead of constantly managing tickets.
Create consistency your team can rely on - When every ticket follows the same path, there is less confusion, fewer questions, and a smoother experience for everyone involved.
Help work move faster without chasing it - Automatic assignments and notifications keep momentum going so tasks do not sit untouched longer than they should.
Keep everyone in the loop without extra effort - Stakeholders get updates automatically, which means fewer manual check-ins and less time spent explaining project status.
Make costly mistakes less likely - Removing manual steps reduces the chances of missed transitions, forgotten updates, or incorrect information slipping through.
Once your workflows start running on their own, the day feels more manageable and your team can put more energy into the work that actually drives progress.
Want to save hours by automating repetitive typing & workflows?
Join over 700,000+ others who are automating workflows with Text Blaze.
How to Set Up Jira Automation (Step-by-Step)
There are two common ways to get started with Jira automation. You can build rules directly inside Jira, or use automation tools to connect Jira with the other apps your team relies on.
Within Jira
Setting up automation directly in Jira is straightforward once you know where to look. The platform provides a visual rule builder that guides you through the process, making it possible to create your first automation in just a few minutes.
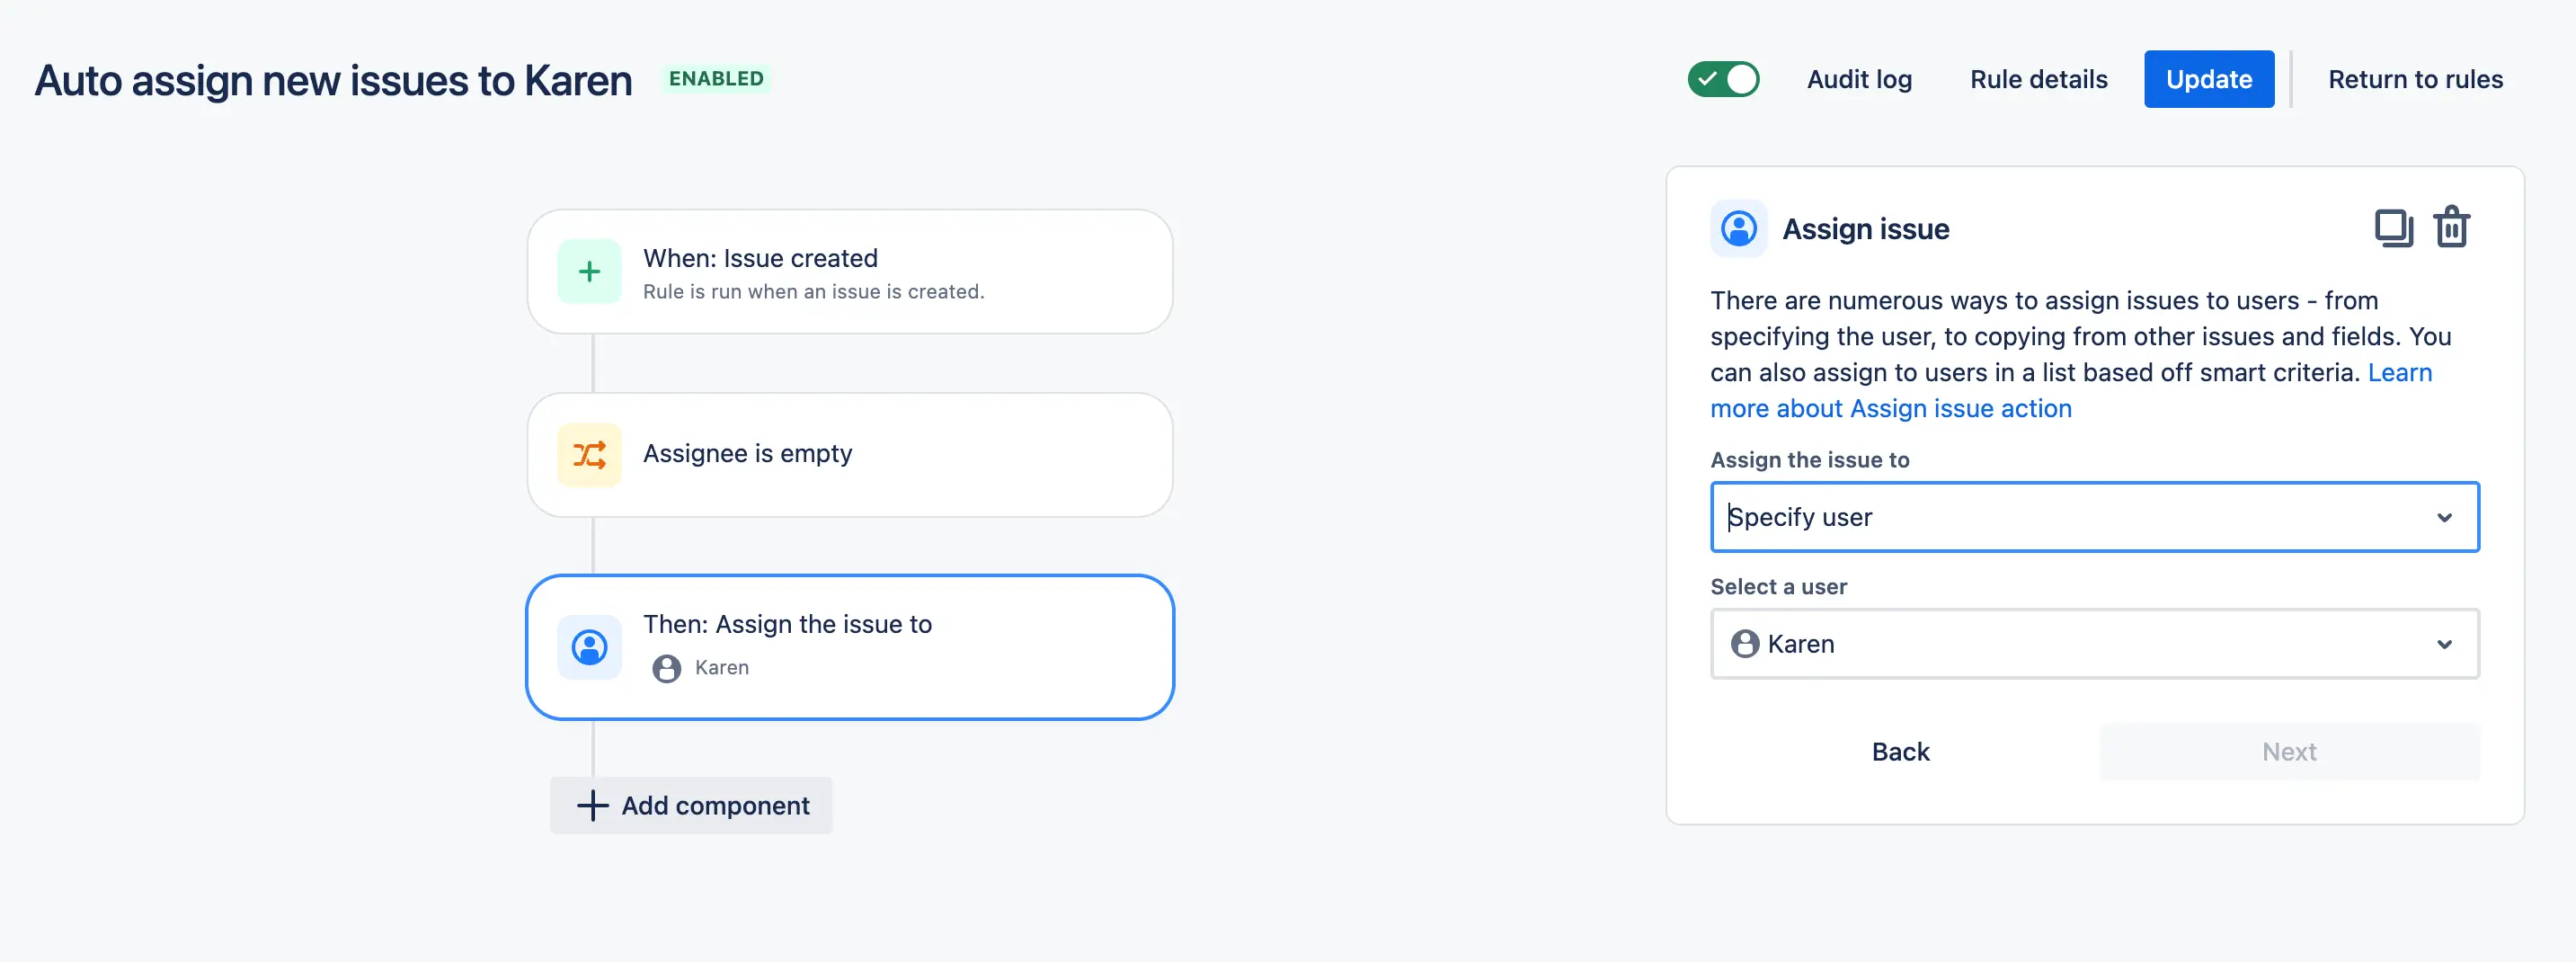
1. Navigate to your project settings
Open the Jira project where you want the automation to run. In the left sidebar, select Project settings, then click Automation. This is where all existing rules live and where you will create new ones.
2. Click “Create rule”
Inside the Automation dashboard, select Create rule. Jira will either show you a blank builder or offer templates for common workflows like auto-assigning tickets or sending notifications. Templates can speed things up, but starting from scratch gives you more control.
3. Choose a trigger
Every automation starts with a trigger, which is the event that kicks off the workflow. Common triggers include when an issue is created, when a field changes, when an issue transitions, or on a scheduled basis. Choose the trigger that naturally aligns with when work should begin.
4. Add conditions to refine when the rule runs
Conditions help prevent the automation from firing unnecessarily. For example, you might limit the rule to a specific issue type, priority level, label, or component. The more intentional your conditions are, the cleaner your workflows will stay.
5. Select the action Jira should take
Actions define what happens after the trigger and conditions are met. You can assign the ticket, update a field, transition the issue, add a comment, create a linked issue, or notify a teammate. Focus on actions that eliminate manual steps your team performs every day.
6. Use smart values for dynamic updates
Smart values allow you to automatically pull information from the issue into comments, messages, and fields. For example, you can reference the issue summary, reporter name, or due date so updates feel specific without requiring manual input.
7. Test the rule before turning it on
Use Jira’s testing capability to confirm the rule behaves as expected. Running a quick test helps you catch missing conditions or unintended actions before the automation affects live tickets.
8. Review the audit log
After testing, check the audit log to see exactly how the rule executed. If something looks off, you can quickly adjust the trigger, conditions, or actions before rolling it out more broadly.
9. Name the rule and turn it on
Give the rule a clear, descriptive name so anyone on your team can understand its purpose at a glance. Once enabled, the automation will begin running in the background, supporting your workflow without additional effort.
Using Automation Tools
Automation tools expand what Jira can do by connecting it to the rest of your tech stack, making it easier to use your data in other places instead of keeping it locked inside one system.
1. Identify where your work happens outside Jira
Think about the tools your team already uses, such as email, internal documentation, chat platforms, or forms. When work starts in other places, automation helps bring that information into your workflow without manual copying.
2. Look for repetitive actions
Many teams spend time writing the same updates, comments, ticket notes, and status messages. Automating or templating these interactions keeps communication consistent while reducing daily effort.
3. Standardize the information you want captured
Decide what details should always be included when work is logged or updated, such as priority, next steps, links, or context. Consistent inputs make your workflows easier to manage later.
4. Build templates that guide the workflow
Create structured templates for comments, ticket descriptions, updates, or handoffs so nothing important gets missed. This allows work to move forward faster without relying on memory.
5. Use dynamic fields to personalize without rewriting
Insert variables like names, dates, ticket details, or project information so messages still feel relevant while avoiding repetitive typing.
6. Trigger actions where the work is already happening
Instead of switching between tabs, use tools that let you insert updates or structured data directly from the page you are on. Reducing context switching helps maintain focus throughout the day.
7. Test the workflow in real scenarios
Try the templates during normal work to confirm they feel natural and actually save time. Small adjustments early can make a big difference in long-term usability.
8. Refine based on team feedback
Ask teammates what feels helpful and what creates friction. Automation works best when it supports how people already operate rather than forcing new habits.
9. Expand gradually as you spot new opportunities
Once the first few workflows are running smoothly, look for other areas where structured inputs or faster communication could remove manual effort.
Want to save hours by automating repetitive typing & workflows?
Join over 700,000+ others who are automating workflows with Text Blaze.
Jira Automation Rules & Examples
Understanding automation is one thing, but seeing how it works in real scenarios makes it much easier to apply.
Here are a few examples of Jira automation that show how it can help you reduce manual work, improve visibility, and keep projects moving without constant oversight:
Auto-assign and prioritize new tickets
This automation ensures that new tickets are routed to the right person immediately while also setting the correct priority. Instead of relying on someone to triage incoming work, the system handles it automatically so nothing sits unclaimed.
- Trigger - When a new issue is created.
- Condition - Check the issue type, component, or labels to determine who should own it and how urgent it is.
- Action - Automatically assign the ticket, set the priority level, and optionally notify the assignee so work can begin quickly.
Automatically move or close stale issues
Tickets that sit untouched can clutter your backlog and make it harder to understand what actually needs attention. This automation keeps your board accurate by prompting updates or closing work that is no longer active.
- Trigger - When an issue has not been updated for a set number of days.
- Condition - Confirm the ticket is still in an open status and does not have recent activity.
- Action - Send a reminder to the assignee, transition the issue to a different status, or automatically close it if inactivity continues.
Sync fields across linked issues
When multiple tickets are connected, inconsistent data can quickly create confusion. This automation keeps related issues aligned so teams always have the same context.
- Trigger - When a field such as priority, status, or due date changes in a linked issue.
- Condition - Verify the issues are connected through a defined link type like blocker or relates to.
- Action - Update the matching field in the linked ticket so both issues reflect the latest information.
Automatically create tickets from structured requests
Work often begins outside Jira, whether it is submitted through a form, captured during a meeting, or shared in a request document. This automation focuses on turning structured inputs into ready-to-work tickets so your team does not have to manually recreate information.
While Jira can automate what happens after a ticket exists, tools that help structure data upfront make those workflows even more effective. Capturing details in a consistent format allows you to quickly generate tickets, populate fields accurately, and reduce the need for back-and-forth clarification.
Instead of copying information between tabs (like your CRM) or rewriting requests, the ticket is created with the context your team needs from the start. This approach strengthens your automation strategy by improving the quality of the data entering Jira, which makes every downstream workflow more reliable.
This is especially seamless when paired with tools like Text Blaze that help automate data transfer, form filling, and actions across tabs. Read more about Text Blaze below.
Best Tool for Automating Workflows in Jira
The right automation tool often depends on where your workflow bottlenecks actually start. Jira handles system-level automation well, but many teams still spend time manually transferring data, filling out fields, writing updates, and repeating the same actions across tools. When those small tasks stack up, they quietly slow down your entire workflow.
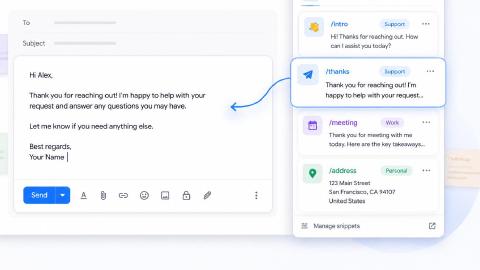
One tool that helps eliminate this type of manual effort is Text Blaze.
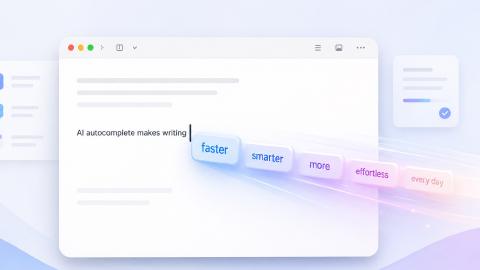
Text Blaze is a workflow automation tool that reduces repetitive typing and manual data entry using keyboard shortcuts and dynamic templates that work in any site or app, including Jira.
Instead of copying information between tabs or rewriting the same responses, you can trigger structured workflows instantly. For example, a support agent could capture customer details, populate a Jira ticket with the correct formatting, and generate a consistent internal update in just a few keystrokes.
Text Blaze can help you:
Automate emails and messages with dynamic templates that adapt to each interaction.
Transfer data between tools without manual copy and paste.
Fill out forms and ticket fields in seconds.
Maintain consistent, on-brand communication across your team.
Reduce mistakes by guiding users with structured templates.
For teams that want their automation strategy to extend beyond ticket rules and into everyday execution, tools like Text Blaze can remove a surprising amount of friction.
If repetitive typing and manual workflows are taking up more time than they should, you can learn more about using Text Blaze for teams to improve communication and productivity.
Want to save hours by automating repetitive typing & workflows?
Join over 700,000+ others who are automating workflows with Text Blaze.
Jira Automation Best Practices
Automation works best when it supports your workflow instead of complicating it. Before building dozens of rules, it helps to focus on clarity, consistency, and long-term maintainability so your automations continue to deliver value as your team grows.
Here are a few Jira automation best practices that we recommend:
Fix workflows before automating them - Automation can speed up a process, but it cannot fix one that is already inefficient. Make sure your statuses, ownership, and handoffs are clear before layering automation on top.
Start with high-impact tasks - Focus first on repetitive actions that happen daily, such as assigning tickets, updating fields, or sending reminders.
Keep rules simple and focused - It is tempting to build complex automations, but simpler rules are easier to manage and troubleshoot. Aim for one clear outcome per rule whenever possible.
Avoid automation overload - Too many rules firing at once can create confusion, duplicate updates, and unnecessary notifications. Build gradually and evaluate whether each automation is genuinely helping.
Name and document every rule - Use descriptive names and add short summaries explaining what each rule does. This makes it easier for teammates to understand your setup and prevents accidental changes.
Look beyond Jira when optimizing workflows - Many delays happen when information is manually transferred between tools or rewritten across systems. Supporting your Jira automation with tools like Text Blaze can help automate data transfer, standardize inputs, and reduce repetitive typing so your workflows stay efficient from start to finish.
Strong automation is not about how many rules you build. It is about creating reliable systems that reduce manual effort and allow your team to focus on meaningful work.
Jira Automation FAQs
Even after setting up your first rule, it is normal to have a few lingering questions. Here are quick answers to some of the most common ones.
Does Jira automation require coding?
Jira automation does not require any coding knowledge. Jira provides a visual rule builder that allows teams to create triggers, conditions, and actions without writing code. Most workflows can be automated in minutes once you understand the structure.
Is Jira automation free?
Jira includes automation features across its plans, but usage limits vary. Teams running large numbers of rules may need a higher-tier plan to support heavier automation. You can check out Jira's pricing here.
What is the difference between workflows and automation in Jira?
Workflows define how issues move through statuses, while automation performs actions automatically when specific events occur. Together, they help standardize how work progresses without manual effort.
How many automation rules should a team create?
Start small and focus on high-impact processes first. As your workflows mature, you can expand your automation gradually without overwhelming your projects.
Build Workflows That Actually Support Your Team
Jira automation works best when it removes friction instead of adding complexity. Jira gives you the structure to route work, manage tickets, and keep projects moving, but the real impact comes from choosing automations that solve everyday slowdowns.
Start small and focus on the areas where your team loses the most time, whether that is triaging tickets, managing stale issues, syncing data, or capturing requests accurately. As those workflows stabilize, you can expand your automation strategy with more confidence instead of trying to overhaul everything at once.
It is also worth remembering that strong workflows are not just about what happens inside Jira. Many delays happen in the moments between systems, when information gets copied, rewritten, or manually entered. Reducing that effort often creates the biggest improvement in how work flows across your team.
To recap, use Text Blaze to automate repetitive typing, transfer data between tools, fill out forms faster, and support the actions that happen around your workflows so your team can focus more on execution and less on manual work.
Give Text Blaze a try for free today!