{formmenu}
Sample Usage
Color: {formmenu: Red; Blue; Green; Black}
Shirt Size: {formmenu: XS; S; default=M; L; XL}
Quick Overview VideoSettings
Setting Name Type Description Positional text The ordered list of menu items. cols number The width of the form menu in columns of characters. multiple yes/no Allow selecting multiple items (default is no). values list Ordered list of menu items, as an alternative to the positional settings. itemformatter function Formats individual menu items. Takes two arguments, the text of the menu item and the index of the menu item. General Form Settings name text Name used for labels and data bindings. default – The default value for the form field. formatter function Formats the value of the field before snippet insertion. General Command Settings trim yes/no/left/right If yes whitespace is removed before and after the command. If left, only whitespace to the left is removed. If right, only whitespace to the right is removed.
| Setting Name | Type | Description |
|---|---|---|
| Positional | text | The ordered list of menu items. |
| cols | number | The width of the form menu in columns of characters. |
| multiple | yes/no | Allow selecting multiple items (default is no). |
| values | list | Ordered list of menu items, as an alternative to the positional settings. |
| itemformatter | function | Formats individual menu items. Takes two arguments, the text of the menu item and the index of the menu item. |
| General Form Settings | ||
| name | text | Name used for labels and data bindings. |
| default | – | The default value for the form field. |
| formatter | function | Formats the value of the field before snippet insertion. |
| General Command Settings | ||
| trim | yes/no/left/right | If yes whitespace is removed before and after the command. If left, only whitespace to the left is removed. If right, only whitespace to the right is removed. |
To learn more about form commands and their capabilities, see the forms guide.
The {formmenu} command is a unique command in that it takes multiple positional settings. Each positional setting that you include is an item that you will be able to select in the menu.
Selecting multiple items
The {formmenu} command also allows you to define a multiple setting. By default it's set to no, but if you explicitly set it to yes, you can now select multiple items.
If you also specifiy a name setting, then the results will be returned as a list if you use it in a {=} (Formula Command) command.
Defining dynamic menu items
You can use the values setting to define all menu items in a single comma-separated list. This is useful when you want to populate menu items dynamically. For example:
Creating conditions from menu options
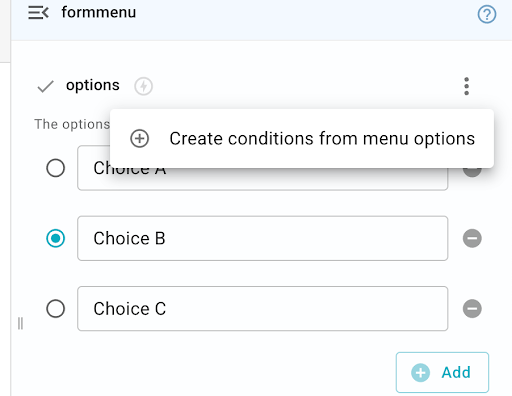
You can quickly create if/else conditions for {formmenu} options by clicking on a form-menu, then clicking the three dots in the right corner of the menu editor.
Doing this adds conditional text that only shows up and gets inserted if a specific item in the menu is selected.
Note that the if statements do not update if the values of the form menu change. If you change values in the menu, you will need to update the conditions accordingly.
Keep in mind that this option is not available when the 'Multiple' setting is selected. If your menu is set to 'Multiple', you will have to use the contains() function in your if statements for each item in the menu.
This option also does not work if you have the 'Advanced Editor' (lightning symbol) turned on for your drop-down menu.
Custom Formatting
There are two settings that customize the formatting of the menu items:
itemformatter: Formats each individual menu item.formatter: Formats the entire list of selected items. This is primarily useful when you have themultiplesetting set toyesand are selecting multiple items from the list.
Using itemformatter
The itemformatter setting is a function that takes the text of each individual menu items and transforms it.
For example, if you wanted to uppercase each menu item, you could do something like the following.
The itemformatter function takes an optional second parameter which is the index of the menu item. This is the position of the item in the list.
For example, we can use that to number our items:
If the syntax of the function above looks unfamiliar, learn more about functions in the Text Blaze Formula Reference.
Using formatter
The formatter setting is a function that allows you to format all of the items in your {formmenu}.
If multiple is yes, it will be passed a list of values (which may be empty if no items have been selected).
(when inserted, the selected items will be separated with a comma.)
If multiple is no, the first parameter of the formatter setting is a single string value.
Combining Both Formatters
The following example illustrates the use of the itemformatter and formatter functions together.
See the Blaze Formula Reference for more information on defining formatting functions.