Quick Start
Quick Overview VideoStep 1: Install the Text Blaze Chrome Extension
You can install Text Blaze straight from this page: Install Extension.
Step 2: Log into the Text Blaze Dashboard
Once Text Blaze is installed, you can access the Text Blaze Dashboard by clicking the extension icon or you can access it directly at https://dashboard.blaze.today.
If this is your first time using Text Blaze, you will be asked to create a Text Blaze account. An account is needed in order to synchronize your snippets between computers and browsers.
If you already have an account, log-in with it.
Step 3: Create a Snippet
In the Text Blaze Dashboard, your snippets are listed on the left. We've created some sample snippets to get you started.
Snippets are organized into folders. You can use folders to structure your collection of snippets. You can move snippets between folders by dragging and dropping them. Select a snippet to edit it.
Each snippet has three properties:
- Label: The snippet name. This is used to identify the snippet in the dashboard.
- Shortcut: The shortcut for the snippet. When the shortcut is typed into an input field on a web page, the snippet is inserted. This is also used to identify a snippet for the {import} command.
- Snippet Contents: The actual contents of the snippet that will be inserted into the page. Snippets can be plain text or styled. Snippet contents may include replacement commands that can customize snippet behavior.
You can create a new snippet by clicking the add snippet button in the upper left corner of the page.
Step 4: Using a Snippet in a Webpage
Once you have created a snippet, there are two ways to enter it in a webpage.
The first entry method is to type the snippet shortcut into an input field. When you complete typing the shortcut, the shortcut will be replaced with the contents of the snippet.
The second entry method is to use the Text Blaze context menu. Just right click on an input in a webpage and you will be given a list of all of your snippets organized by their folder.
Step 5: Sharing Snippets
Once you have created a few snippets that your happy with, you might want to share them with colleagues and friends.
For more information about sharing snippets, check out our Sharing Snippets and Folders quide.
Step 6: Snippet shortcuts best practices
As you create and share snippets, adopting shortcut best practices makes recalling shortcuts easier and helps avoid conflicts.
Adopt a descriptive standard for your shortcuts: A standard will make it easy to recall the shortcut quickly. For example the shortcut for grading an English essay could be
/english.gradeand/math.gradefor grading Math.Special characters in shortcuts: Special characters are not required, but they help ensure snippets don't trigger by mistake. You can use any special character (e.g.,
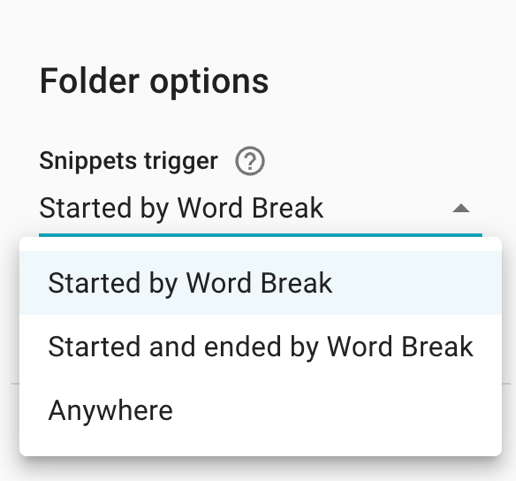
/,-,., or#) and place them anywhere in the snippet (e.g./before,in.the.middleorafter-).Adjusting triggers and word breaks: By default, snippets trigger if typed after a word break (dot, space, etc.) You can change this setting to trigger only when the shortcut is typed after a word break and followed by a word break, or to trigger whenever a shortcut is typed regardless of word breaks. To access this option, left-click on the snippet folder, and locate the trigger setting in the bottom right corner.
Case sensitivity in shortcuts: By default, snippet shortcuts are not case-sensitive. If you need your snippets to respond to specific capitalization, visit the Blaze documentation on case-sensitive insertion.
Distinguishing between shared and personal snippets: When sharing snippets with others, you want to make sure the shared snippets don't conflict with their personal snippets. Using different special characters for shared vs. personal snippets can help avoid these conflicts. For example, use
/sigfor a personal snippet and;sigfor a shared snippet to avoid confusion.
By applying these practices, you can organize snippets effectively, reduce conflicts, and improve efficiency.
Step 7: Next Steps
Now that you are up and running with Text Blaze, it's time to dig in some more.
- Visit our community site to get ideas for how to use Text Blaze.
- Spend some time familiarizing yourself with the available Text Blaze commands.
- Visit our Gallery Pages to see more example snippets and read case studies on how users saved many hours using Text Blaze.
- Learn about Text Blaze's powerful forms feature.
- Simplify your workflow with autopilot.