Rules & Validation
Quick Overview Video
Snippets can handle a variety of different situations when they’re powered by rules (also known as conditional logic). Instead of needing to have a snippet for every potential situation, it’s possible to create rules within your snippet that dynamically adjust its content and behavior to the situation.
Adding logic to snippets with the {if} command
Rules, or logic, in snippets are powered by the {if} command. When creating an {if} command, a condition is defined, and that condition should resolve to TRUE/FALSE, or YES/NO.
Those conditions are evaluated when the snippet is used. If the condition resolves to yes, a section of the snippet will be shown. If the condition resolves to no, a different section of the snippet (or nothing) will be shown.
Using the values of form fields in rules
Rules are typically applied on the values of form fields or variables. The value of named form fields can be used in {if} commands. (Refer to this section of the forms guide for full details on how to name fields within your snippet.)
This dropdown field has a name of `options`: {formmenu: default=Option A; Option B; Option C; name=options}
This toggle field has a name of `special deal`: {formtoggle: name=special deal}
Form field names will appear when creating a condition in the {if} command. Clicking on them will add them to your condition.
How you use them will depend on the type of field it is, and what the snippet’s rule is evaluating. Below are some examples of common uses, but this is not exhaustive.
- Text fields can be evaluated to see if specific text is entered. A condition for that might be written like {if: `first name`="Andrew"}
- If numbers are entered into the text field (such as one named `amount`), the number can be compared to other numbers such as {if: amount>5} or {if: amount=10}.
Dropdown fields are typically evaluated to see if a specific value was selected. For the dropdown field called "options" in the snippet above this section, a condition might be written as {if: options="Option C"}.
Toggle fields only have two states: yes or no. Conditions that evaluate toggle fields can be written in two ways:
The first would be to write the specific state, such as {if: `special deal`=Yes}.
The second would be to imply the yes or no, such as {if: `special deal`} and {if: not `special deal`}.
Defining the outcomes of rules
Now that we’ve looked at how to define conditions, let’s look at defining the results of those rules. All conditions must resolve to TRUE/FALSE or YES/NO, and the outcome for TRUE/YES must be defined. The FALSE/NO outcome is optional.
Structure of the {if} command
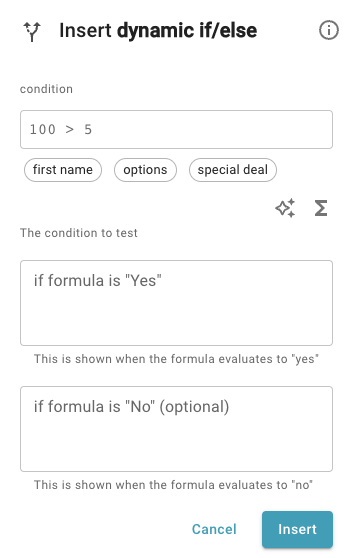
Once an {if} command has been added to a snippet, you’ll see that there are multiple components to it:
{if: amount>99}That number is greater than or equal to 100{else}That number is lower than 100{endif}
Each portion of the {if} command

The first portion contains the condition that has been defined. This snippet uses the condition {if: amount>99}.
Immediately after the condition is what should happen if that condition evaluates to TRUE/YES ("That number is greater than or equal to 100").
Next is the {else} tag. This tag indicates what the rule should do if the condition evaluates to FALSE/NO. The {else} tag and the text that follows it is optional if you’d like nothing special to happen in the case the condition resolves to FALSE/NO.
Finally, the {endif} tag ends the rule. This tag is always required.
Conditions using multiple fields
Sometimes your rules will need to consider more than a single field to determine what the outcome should be. This can be done with the AND operator, which is one of several logical operators available.
Evaluating multiple conditions
The examples in this guide so far have included only two outcomes for the rule: TRUE/YES or FALSE/NO. It is possible to define multiple different conditions that are all evaluated in a rule, though.
The simplest way to achieve this is using multiple conditions.
An alternative is creating one command with multiple conditions using the {elseif} tag. The {elseif} tag allows you to define a new condition within the rule so that your rule can handle multiple scenarios.
In the snippet above, additional text is added if Option A, Option B, or Option C is selected. The output text is different depending on which is selected, and nothing happens if the blank option, Option D, or Option E are selected.
Mutually exclusive conditions
When using {elseif}, ensure that conditions are mutually exclusive. If two conditions are true at the same time, whichever one is first in the {if} command will be used.
If you have multiple conditions that can be true at the same time like that, then the order of the conditions matters.
For instance, the following snippet will always output "Greater than 10" even if a number over 100 is entered, because both are true and "Greater than 10" appears first in the snippet.
However, if I change the order of my conditions, they're evaluated in that updated order and I can get two different outputs (either above 100 or above 10)
This situation can also be avoided by writing very specific conditions for your snippet. Continuing the same example, I can set a minimum to ensure that the conditions are mutually exclusive:
Automatically create conditions from menu options
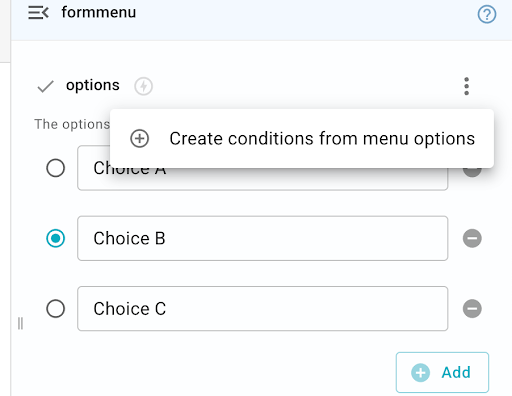
You can create conditions for {formmenu} options by clicking on a drop-down menu, then clicking the three dots in the right corner of the menu editor.
This option adds an if statement for each menu item, as well as text that only shows up and gets inserted if a specific item in the menu is selected.
Note that the if statements created do not update if the values of the form menu change. If you change values in the menu, you will need to update the conditions accordingly.
Keep in mind that this option is not available when the 'Multiple' setting is selected. If your menu is set to 'Multiple', you will have to use the contains() function in your if statements for each item in the menu.
This option also does not work if you have the 'Advanced Editor' (lightning symbol) turned on for your drop-down menu.
Common rules uses
Quality assurance - validating snippets' content
A common use of rules is to validate that things entered into other fields meet the requirements of those fields. Validations often leverage the {error} command to prevent a snippet’s contents from being inserted if the validation fails.
{if: condition="new" AND miles>100}{error: A new car cannot have more than 100 miles on the odometer. Change the condition field to used; block=yes}{endif}
Hi {formtext: name=firstname},{if: firstname=""}{error: Name cannot be blank, ensure you add a name before proceeding; block=yes}{endif}
It was great meeting with you earlier today.
Decision trees - nesting forms and rules within rules
All examples in this guide to this point have simply resulted in different text being generated. However, it’s possible to nest anything inside of the rules inside of your conditions.
For instance, you may have a field that needs to be added only when it’s relevant and shouldn’t be displayed otherwise. Here’s a snippet that does that:
This post on the Text Blaze Community goes into further detail about how to nest more fields together and using them to create decision trees.
Snippet directory - Import snippets based on rules
Once you’ve created a large number of snippets, it can be hard to keep track of the shortcuts for them. We encourage customers to create "grouped snippets" or "main snippets" that have a simple shortcut, and then based on selections made in that main snippet, other snippets are imported.
This helps users find the right snippet to use without having to remember all of the individual shortcuts.
Note: snippet imports don’t work inside Guides like this, so below is just to show how that type of snippet is structured.
Contextual snippets - Rules based on where the snippet is used
The {site} command has many different functions, and they work very well with writing rules in Text Blaze. Two functions that work particularly well are the website URL option and the website content option.
Using the website URL option inside of a rule enables your snippet to perform different actions depending on the site where it’s triggered. Both examples below leverage the contains function to evaluate whether certain text is contained in something.
For instance, the following snippet would have a different greeting if it was used in LinkedIn vs. Gmail:
Using the website content option it’s possible to have Text Blaze read specific content and vary messaging based on that. The below snippet will only work on a LinkedIn profile page, and checks whether the person has set themselves to "open to work":